Cathe: Simulation Management
Overview
The CaThe module of the Cambridge Numerical Solutions (CNS) platform provides a number of features for simulation management, including, for example, the ability to organise simulations into folders, simulation cloning, and simulation export/import functionality. This tutorial explains how the various features can be used from the ‘Simulations’ page. For instructions on accessing the ‘Simulations’ page, see the tutorial ‘Performing a simulation from scratch’.
Creating a new folder
Your account will always contain a ‘Default’ simulation folder into which simulations for this module can be created. It is possible to create a new folder by clicking on the ‘New folder’ button.
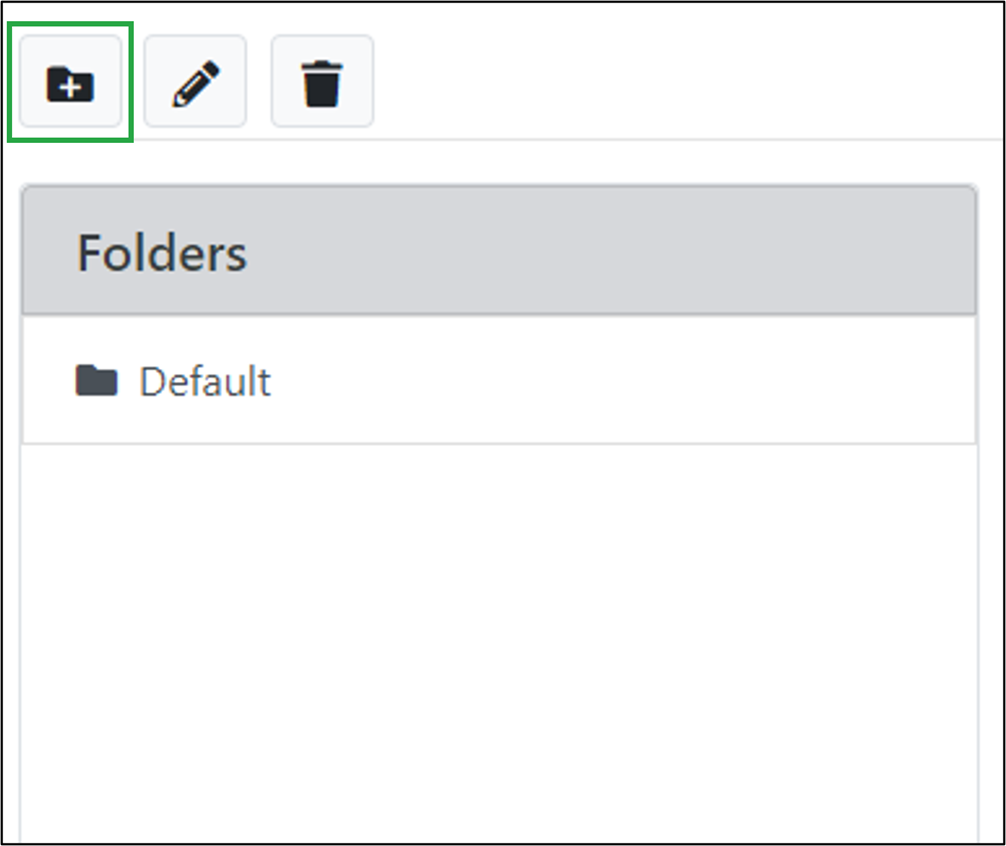
Locating the ‘New folder’ button.
In the ‘New folder’ window which opens:
- For the ‘Folder name’ field, enter the name that you would like to use for the folder (e.g. ‘Folder 1’).
- Click on the ‘Create’ button.
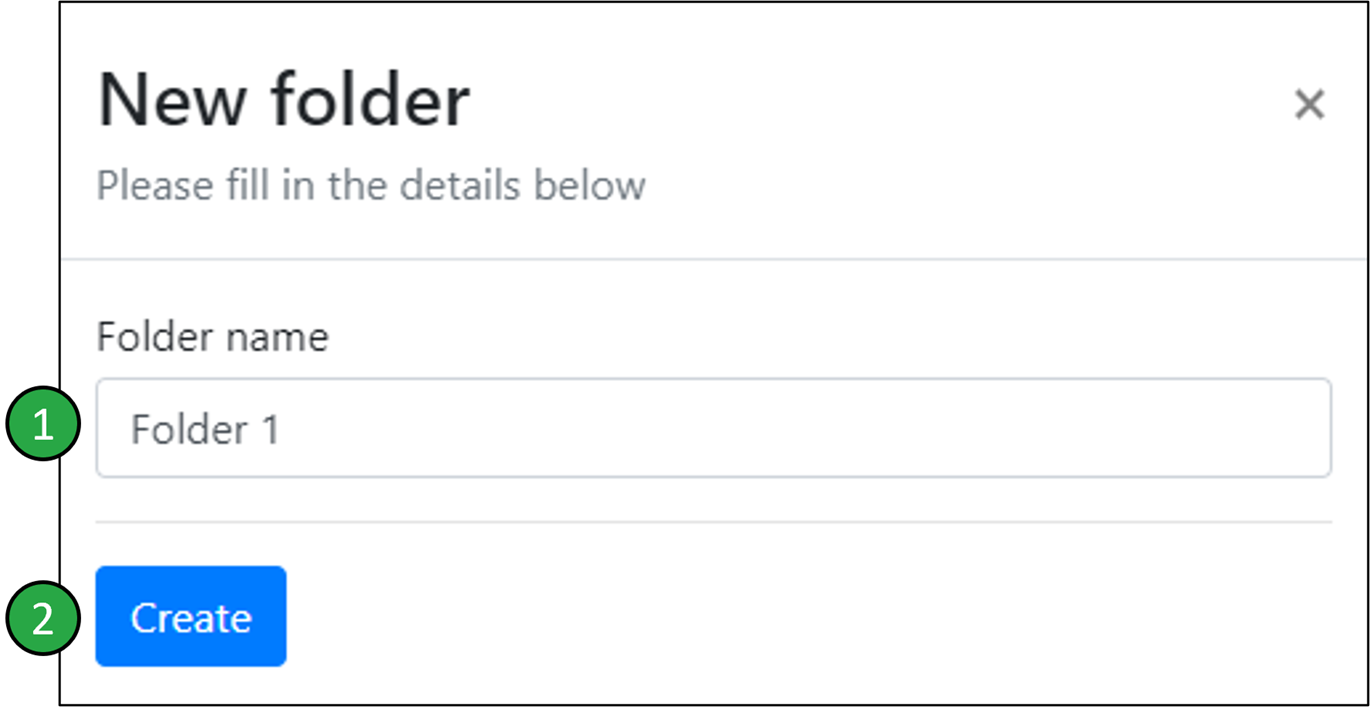
Naming and creating the new folder.
The newly created folder will now appear in the list of folders:
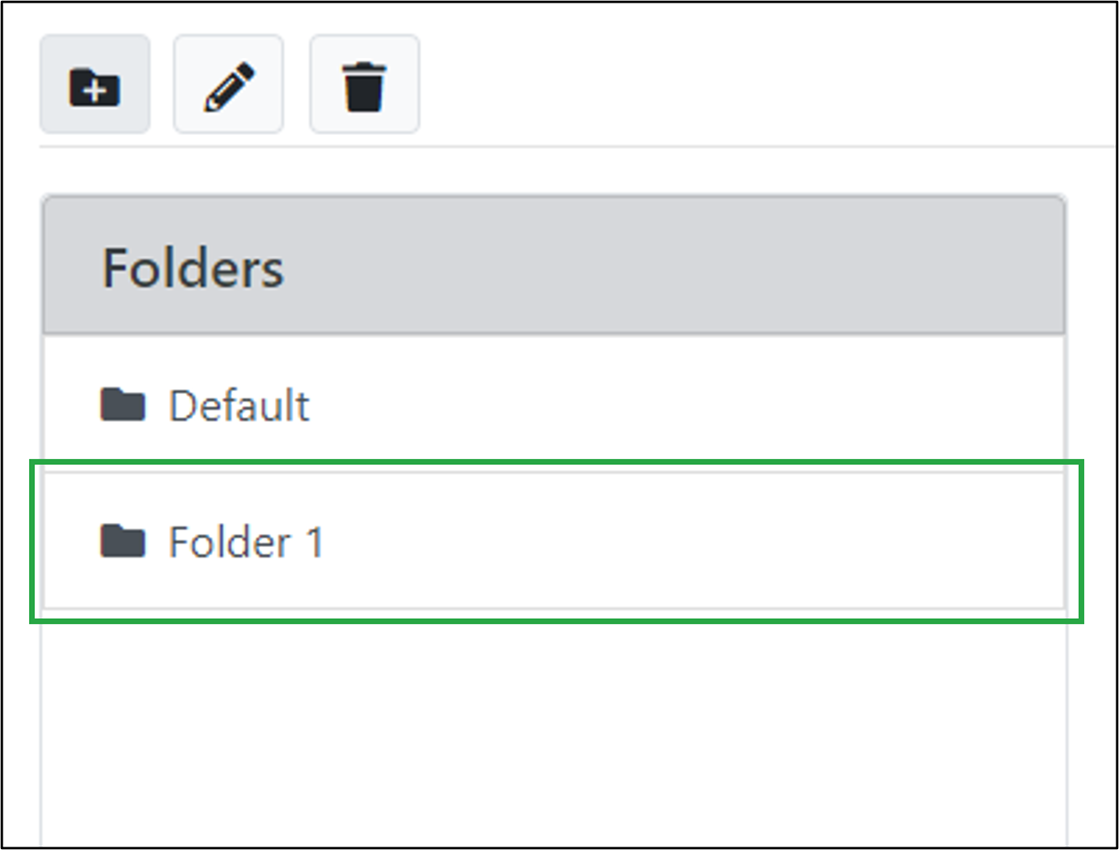
Newly created folder appearing in the list of folders.
Renaming a folder
To rename an existing folder (e.g. ‘Folder 1’):
- Click on it from the list of folders.
- Click on the ‘Edit folder’ button.
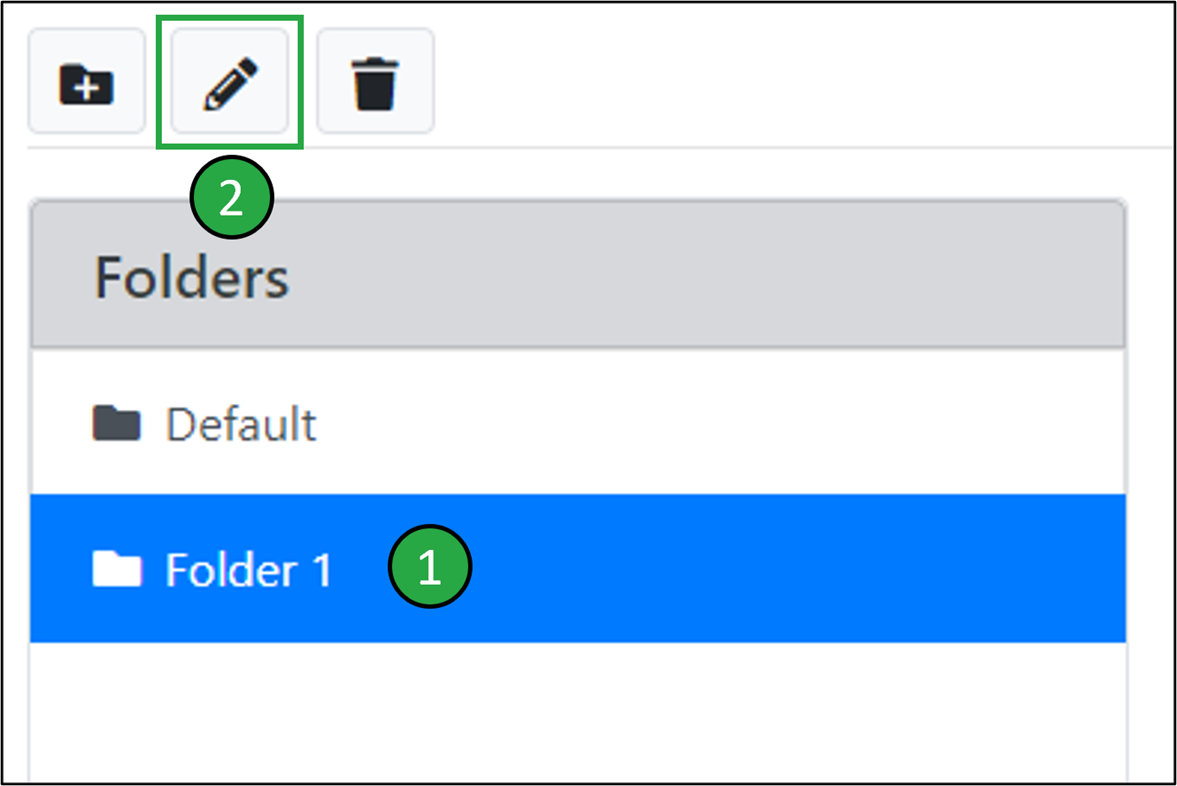
Locating the ‘Edit folder’ button.
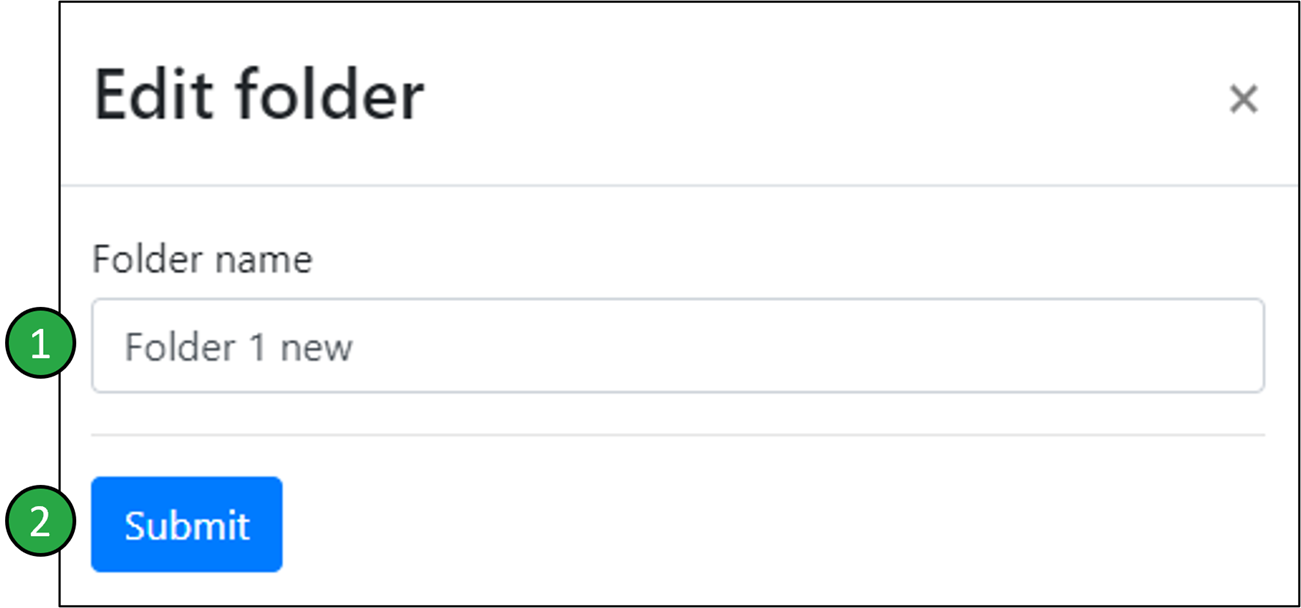
In the ‘Edit folder’ window which opens:
- For the ‘Folder name’ field, enter the new name that you would like to use for the folder (e.g. ‘Folder 1 new’).
- Click on the ‘Submit’ button.
 Renaming an existing folder.
The folder will now appear as renamed in the list of folders:
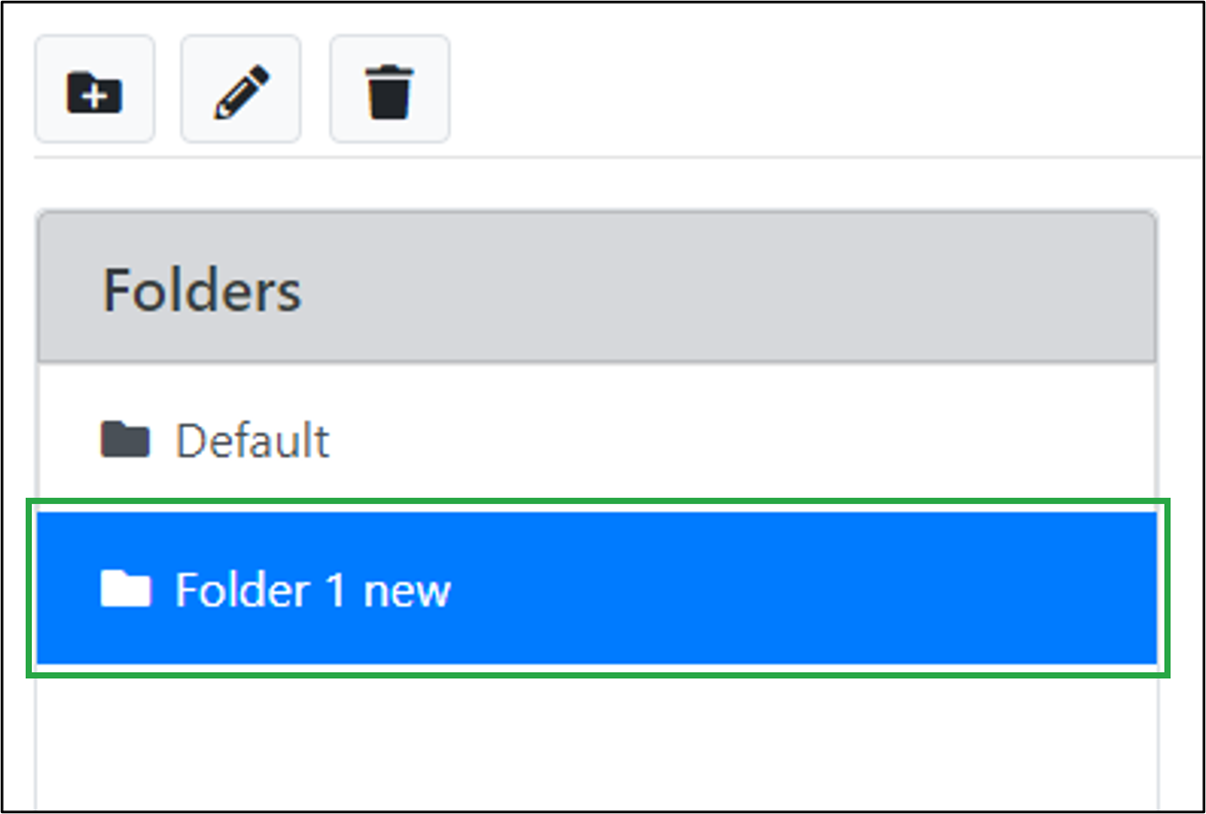
The renamed folder appearing in the list of folders.
Please note that the ‘Default’ folder cannot be renamed.
Deleting a folder
To delete an existing folder (e.g. ‘Folder 1 new’):
- Click on it from the list of folders.
- Click on the ‘Delete folder’ button.
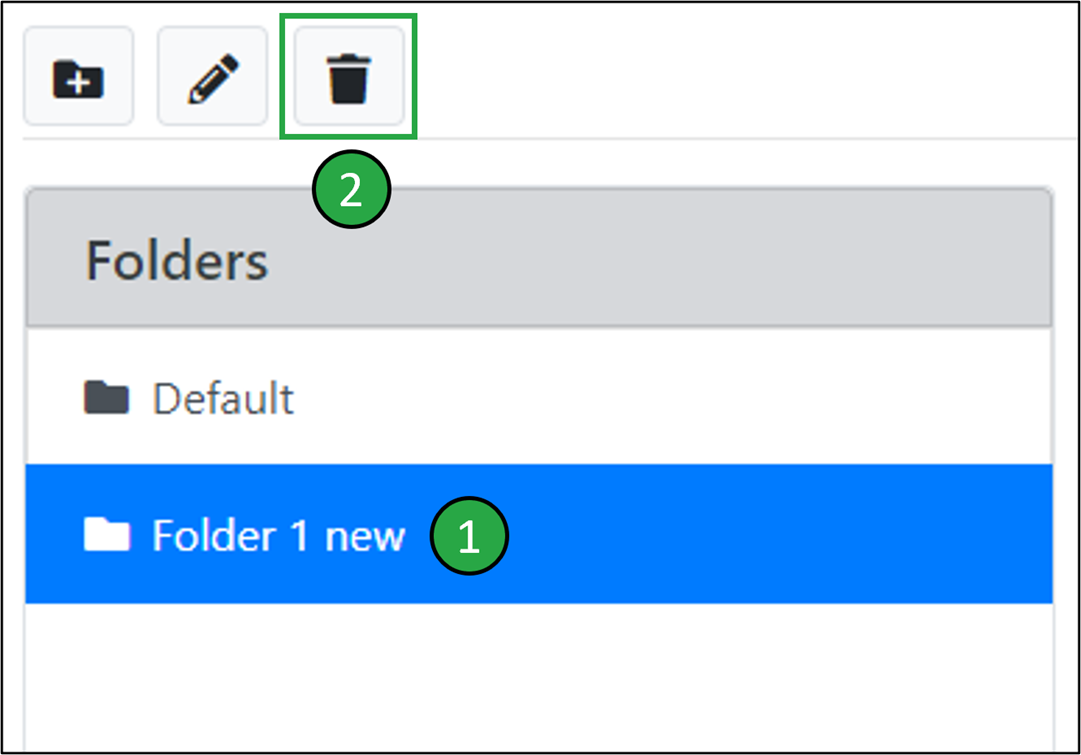
Locating the ‘Delete folder’ button.
The deleted folder will be removed from the list of displayed folders:
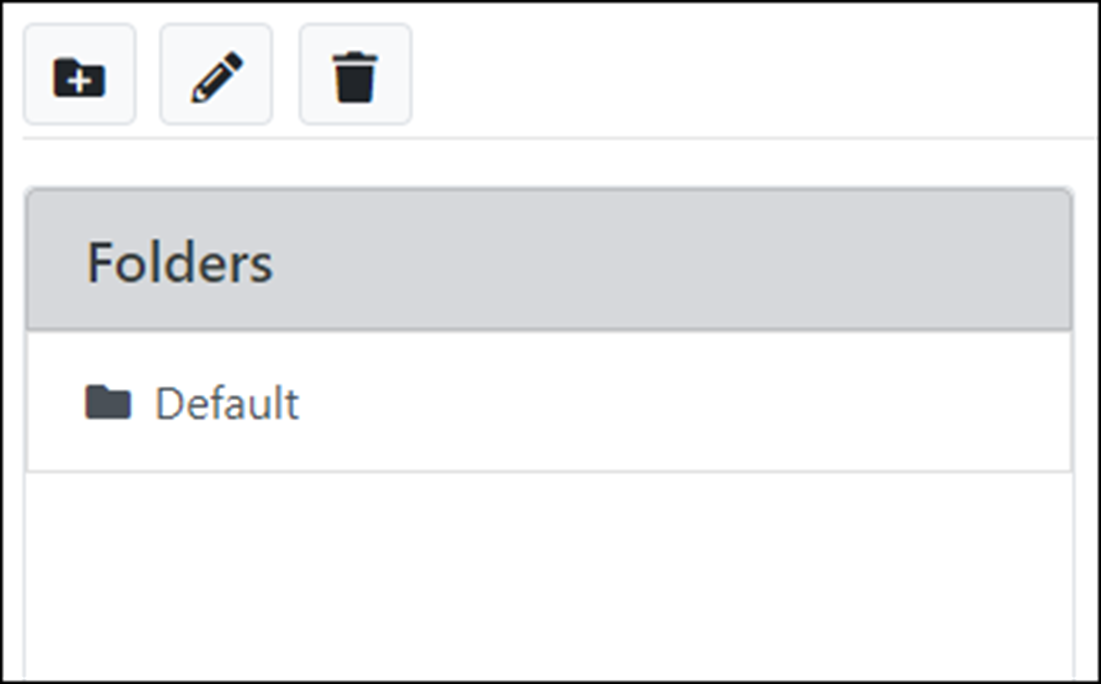
The deleted folder is removed from the list of displayed folders.
Please note that only empty folders, i.e. folders with no simulations inside them, can be deleted. Furthermore, the ‘Default’ folder cannot be deleted.
Creating a new simulation within a folder
To create a new simulation within a simulation folder (e.g. ‘Folder 2’):
- Click on the folder from the list of folders.
- Click on the ‘New simulation’ button.
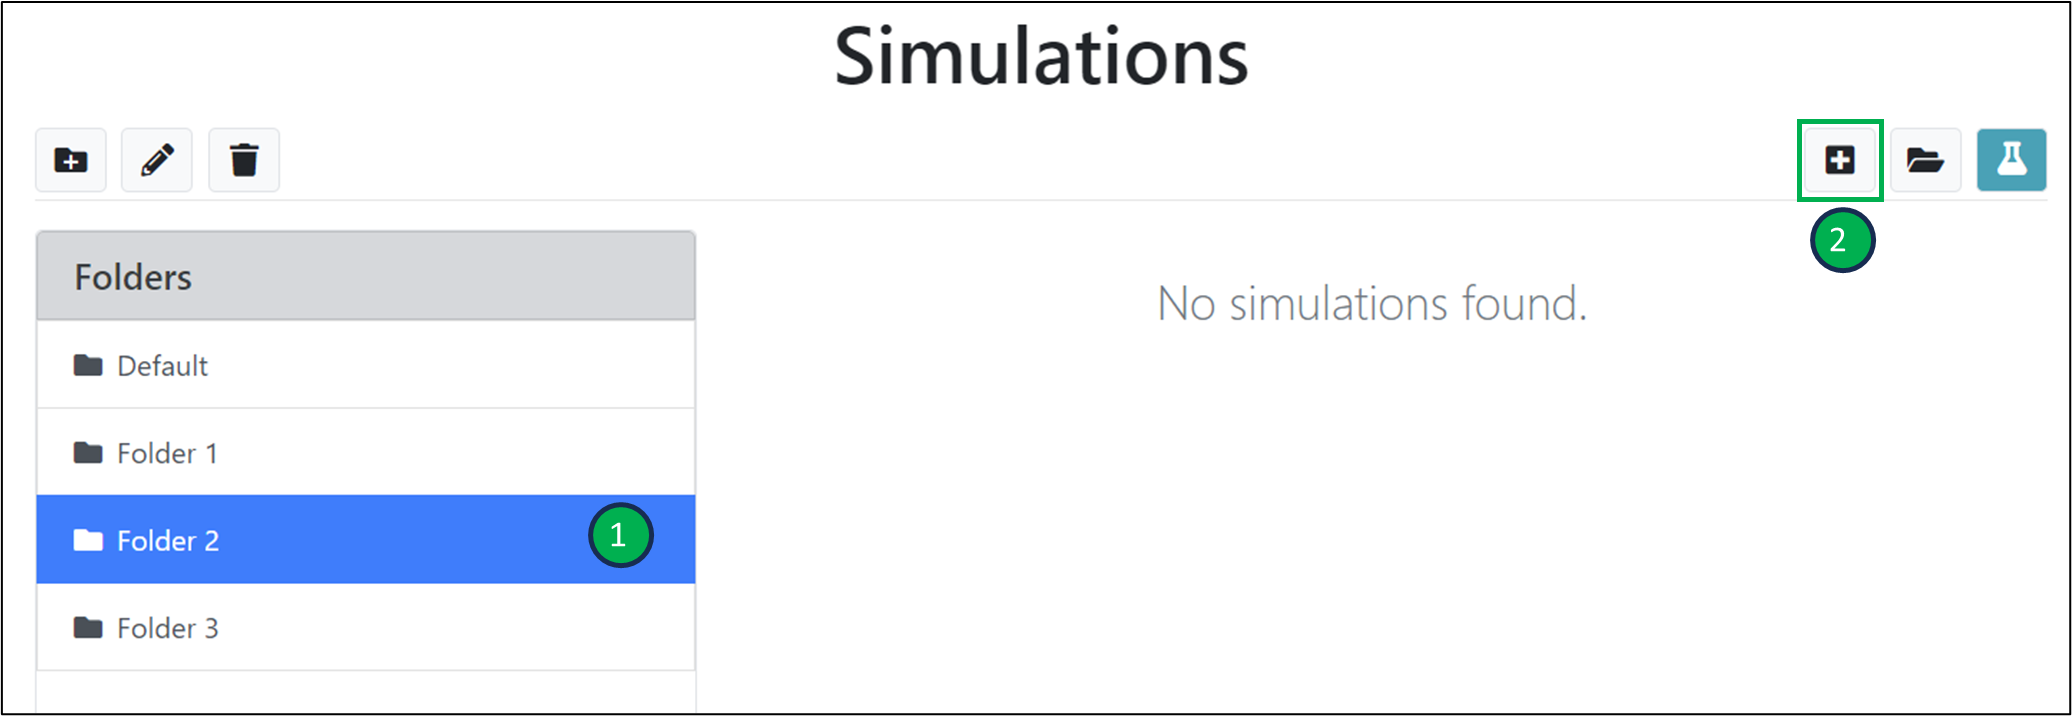 Creating a new simulation within an existing folder.
In the ‘New simulation’ window that opens:
- For the ‘Simulation name’ field, enter the name that you would like to use for the simulation (e.g. ‘Simulation 1’).
- Click on the ‘Create button’ (For information on simulation templates, see the tutorial on ‘Creating a simulation from a template’).
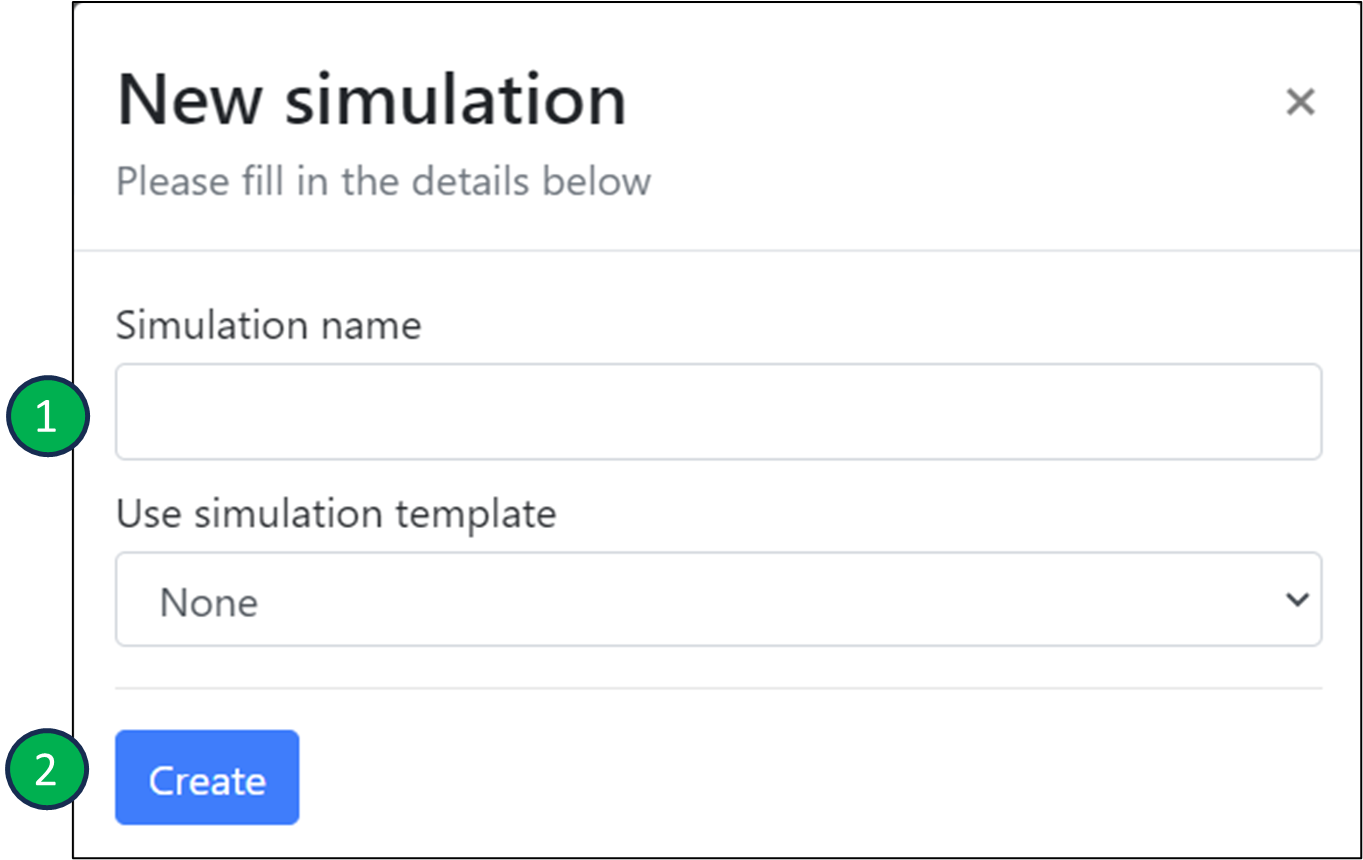
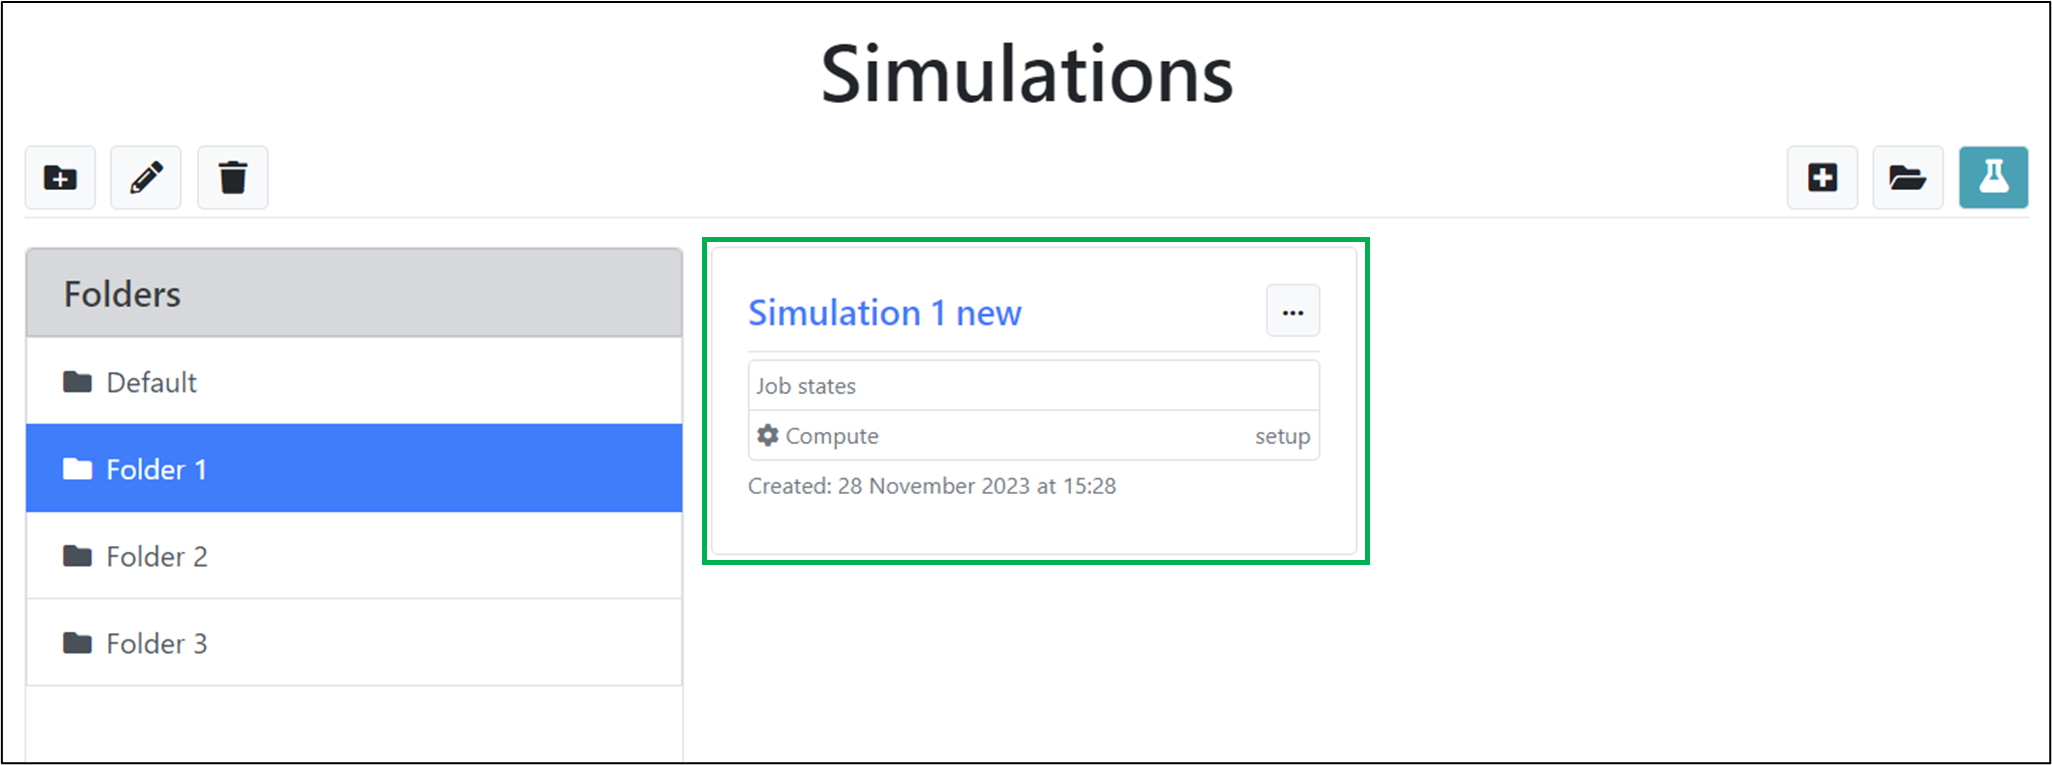
Naming and creating a new simulation.
The newly created simulation will appear in the list of simulations for the selected folder:
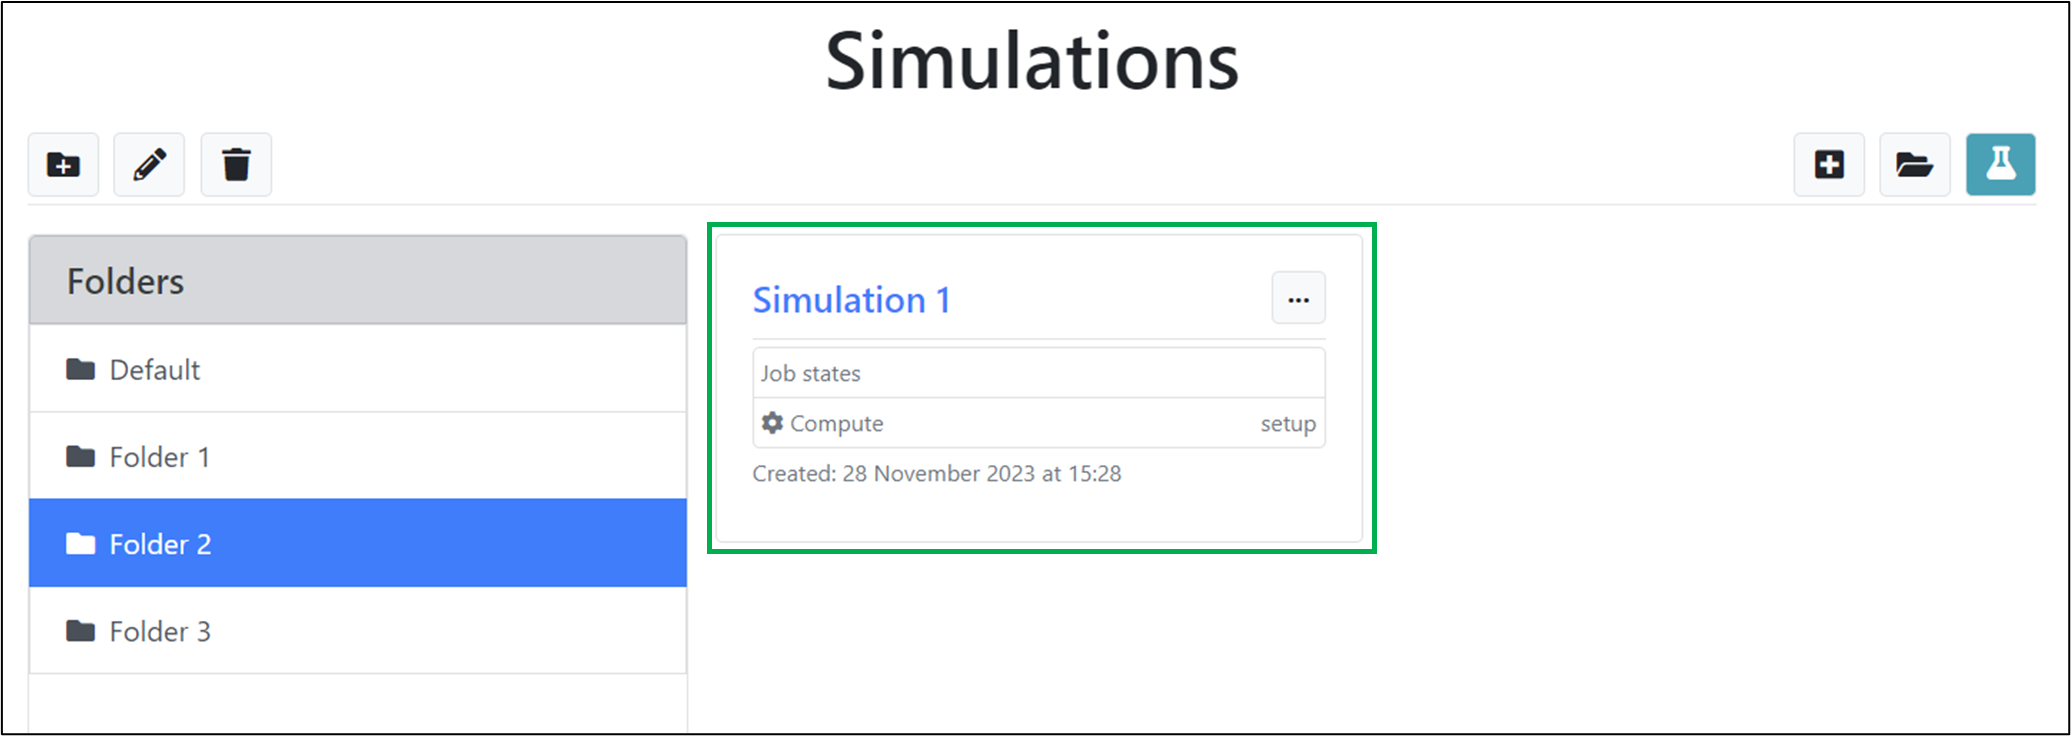 Newly created simulation within an existing folder.
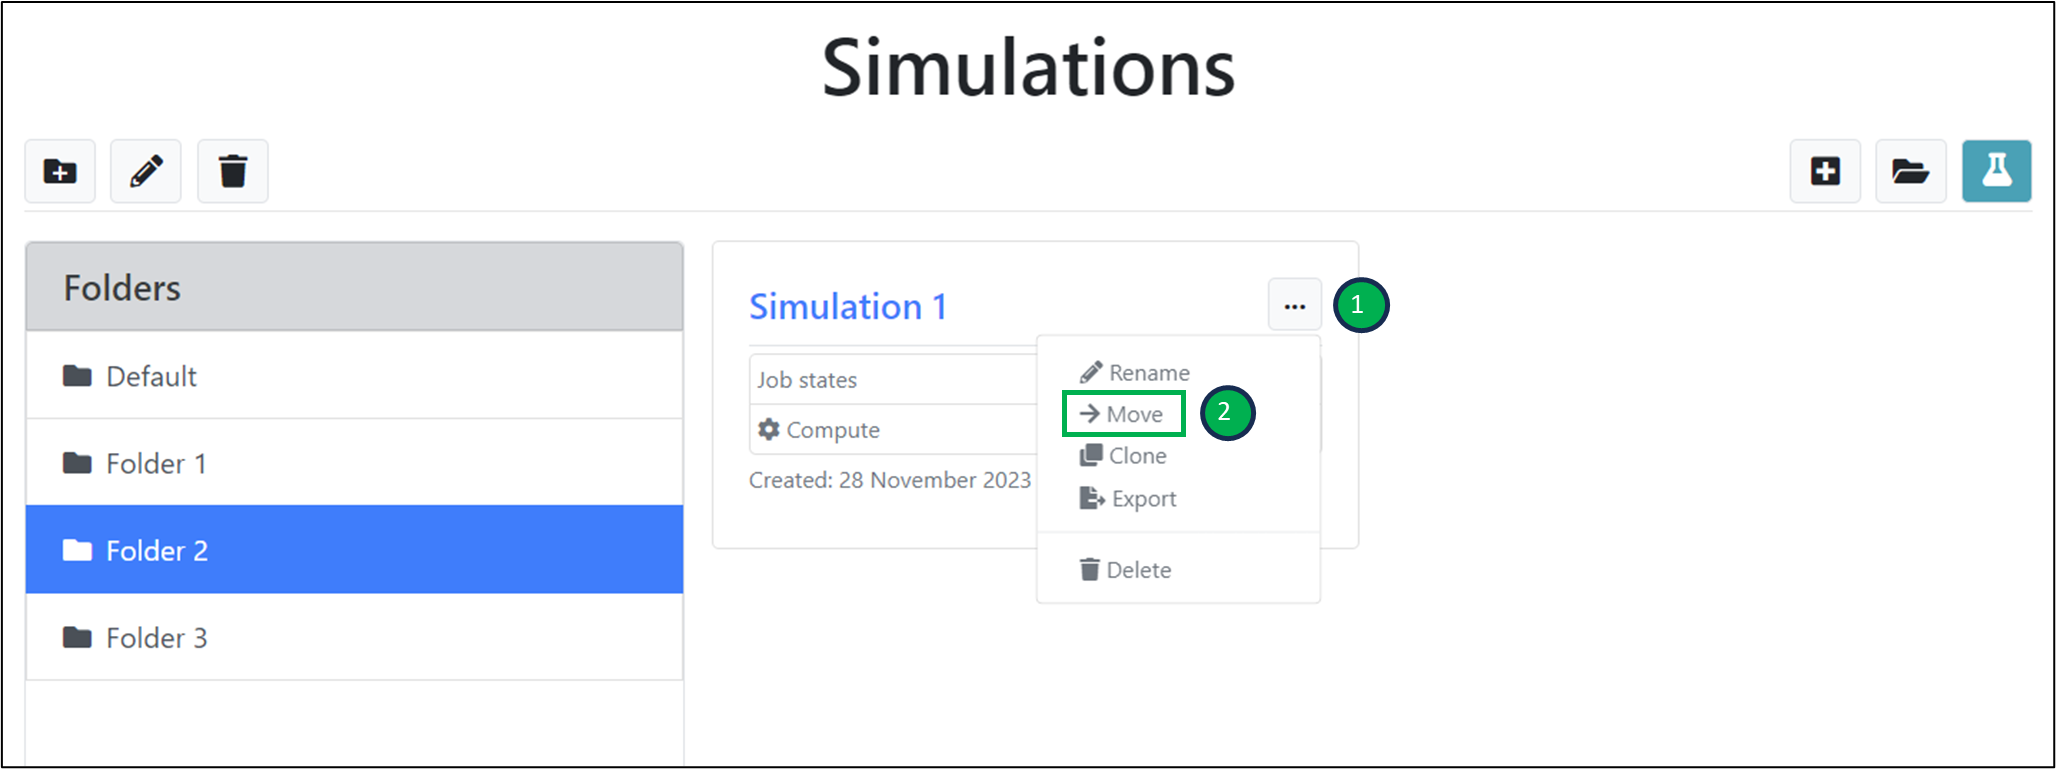
Moving simulations between folders
To move an existing simulation (e.g. ‘Simulation 1’) from its current folder (e.g. ‘Folder 2’) to another folder (e.g. ‘Folder 1’):
- Click on the dropdown button for the simulation.
- Click on the ‘Move’ option.
 Moving an existing simulation from its current folder to another one.
In the ‘Move simulation’ menu window that opens:
- From the dropdown, select the destination folder (e.g. ‘Folder 1’) that you wish to move the simulation to.
- Click on the ‘Move’ button.

Specifying the destination folder to move a simulation to.
The simulation now appears in the list of simulations of the destination folder only:
 List of simulations in the destination folder.
Exporting a simulation file
If you would like to share a simulation setup with another user, or would like to create a local record of a particular simulation setup, the most convenient way to do this is by exporting the ‘simulation file’ corresponding to the simulation. The file can later be imported into the platform to reproduce the simulation setup.
To export an existing simulation (e.g. ‘Simulation 1’):
- Click on the dropdown button for the simulation.
- Click on the ‘Export’ option.
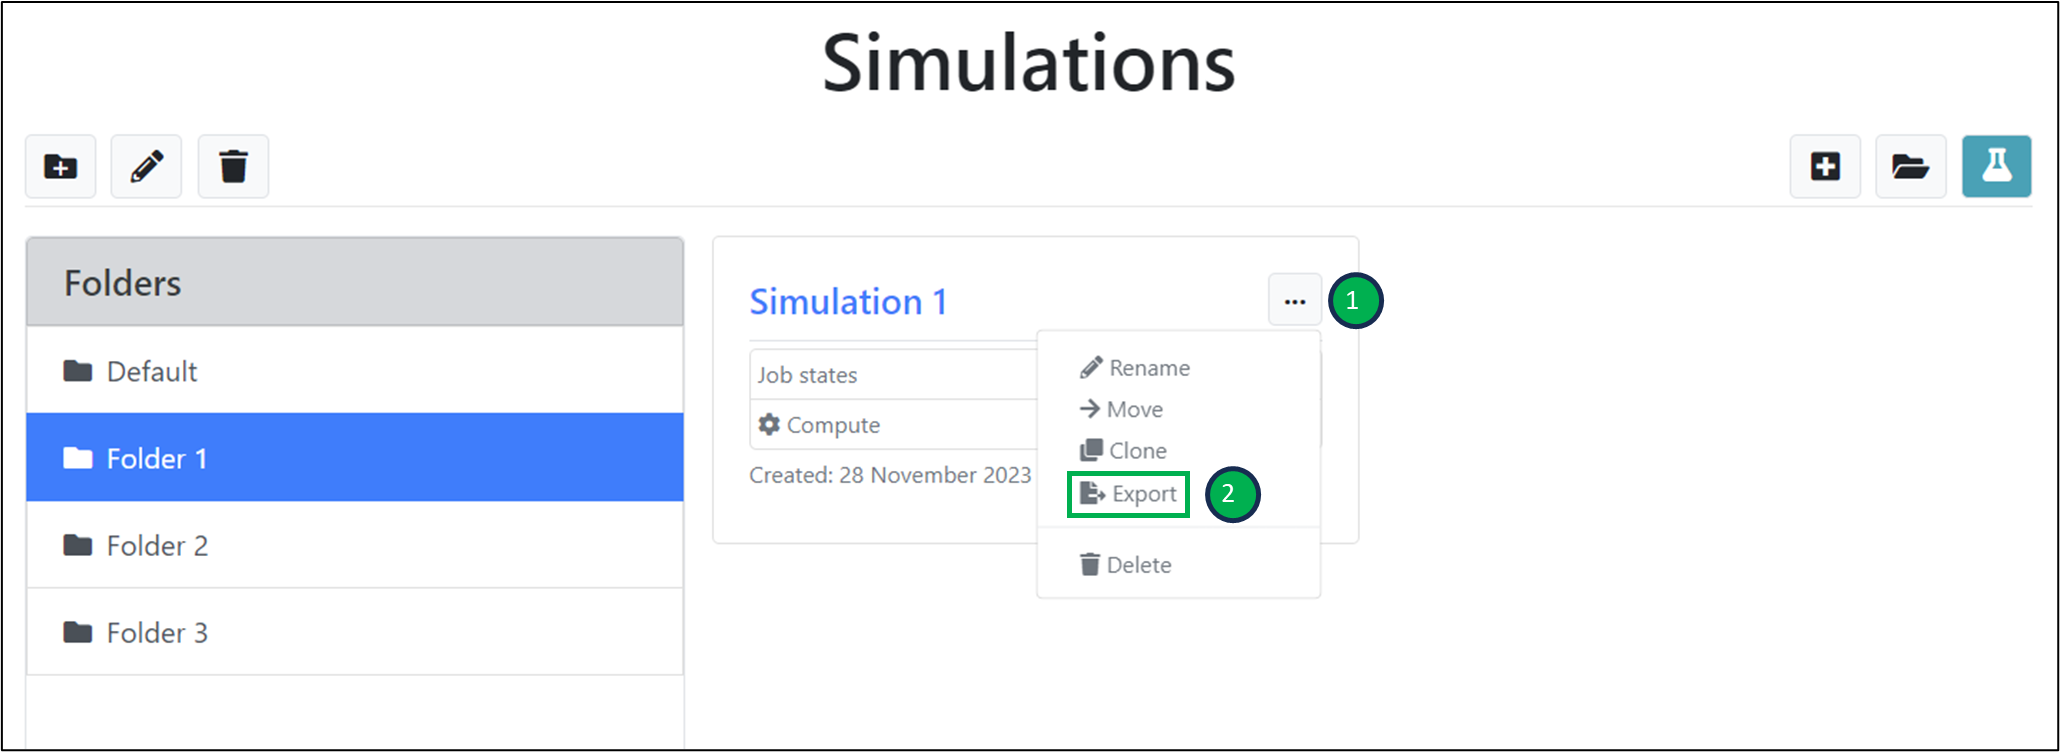 Exporting a simulation file.
The simulation file in ‘.zip’ format will be automatically downloaded to the default location for downloads on your device (for example, the ‘Downloads’ folder on your computer).
Importing a simulation file
To import a simulation file that you have previously exported or which another user has shared with you, click on the folder into which you want to import the simulation into (e.g., the ‘Default’ folder), and then click on the ‘Import simulation’ button.
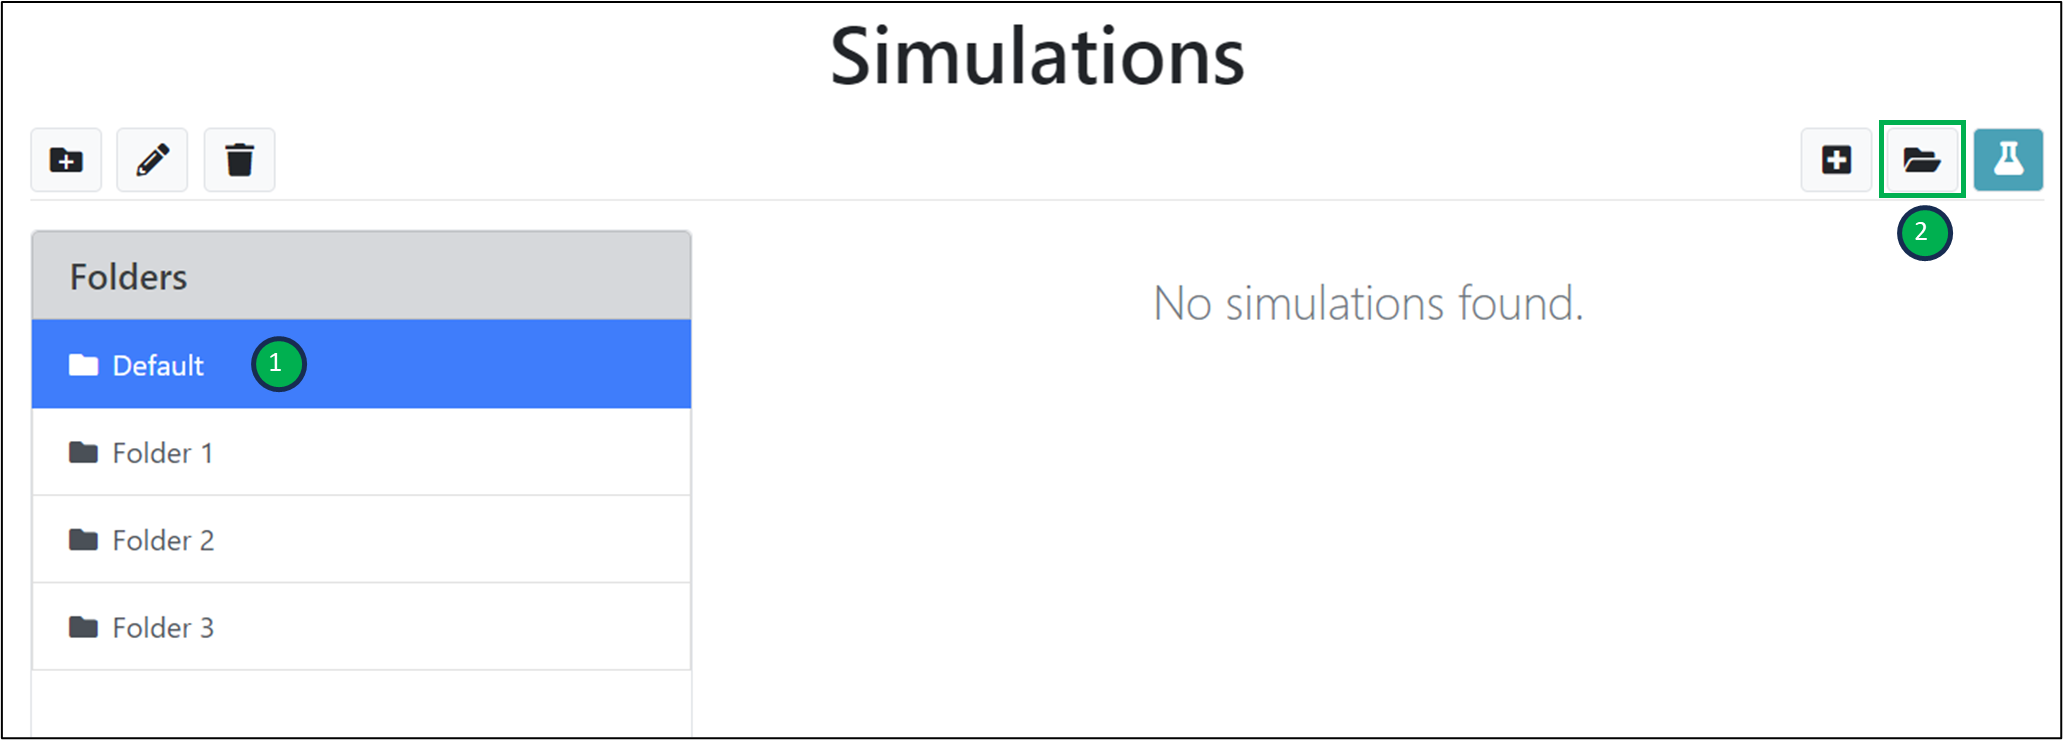 The ‘Import simulation’ button for importing a simulation file.
In the ‘Import simulation’ window which opens:
- In the ‘Simulation file to import’ field, click on the ‘Browse’ button and select the simulation file that you wish to import.
- When possible, the ‘Simulation name’ will be automatically filled in from the uploaded file.
- If you would like to modify this, click on the ‘Edit simulation name’ checkbox that has appeared below the ‘Simulation name’ field.
- If this was not automatically filled in, please manually type in your preferred simulation name.
- Click on the ‘Import’ button.
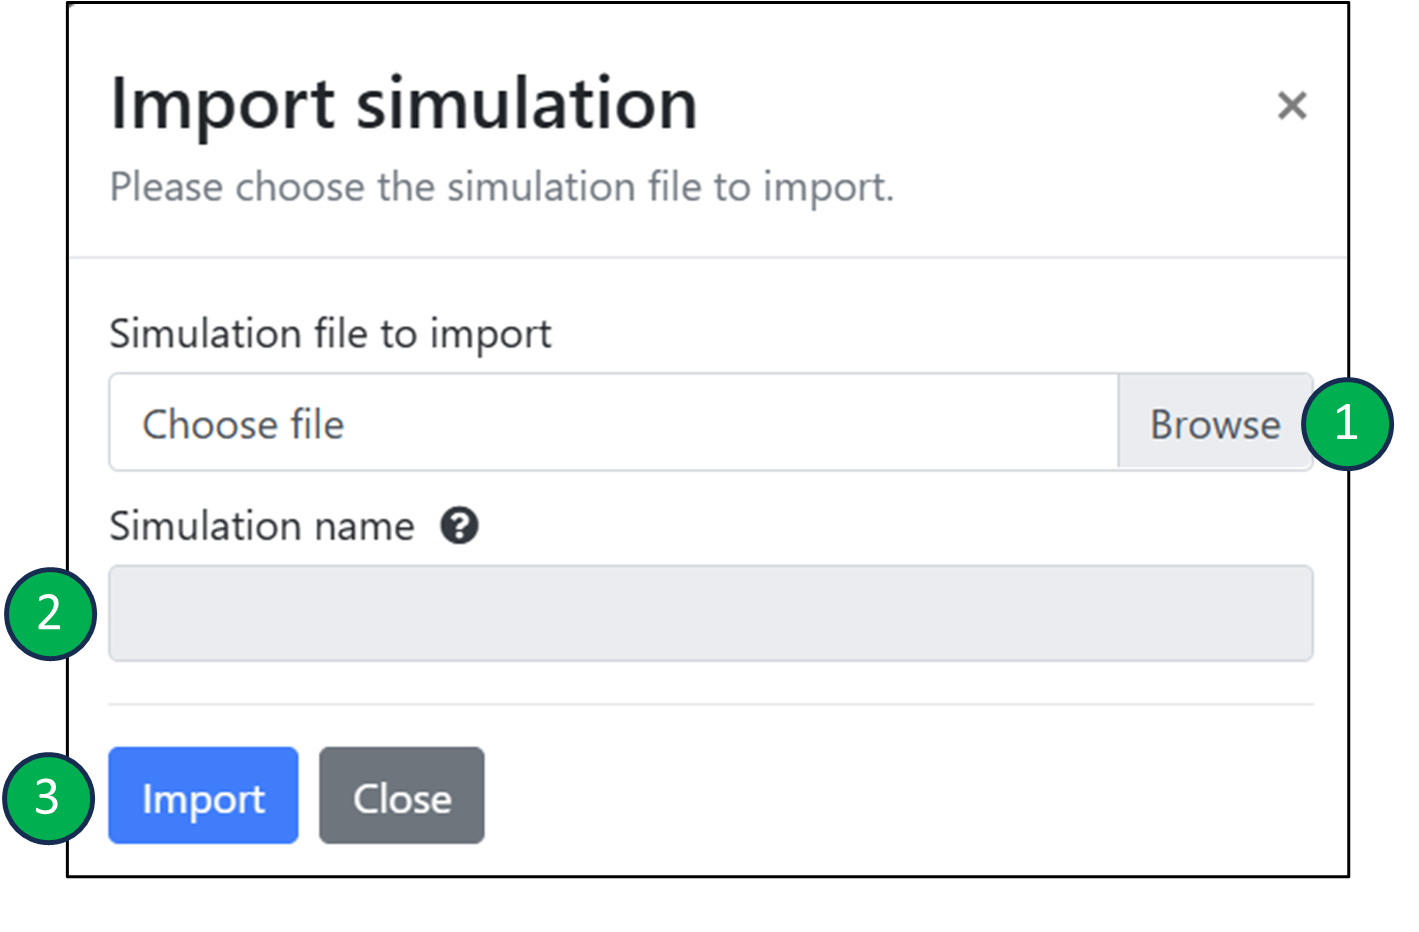
Importing a simulation file.
The simulation will be imported into the previously selected folder:
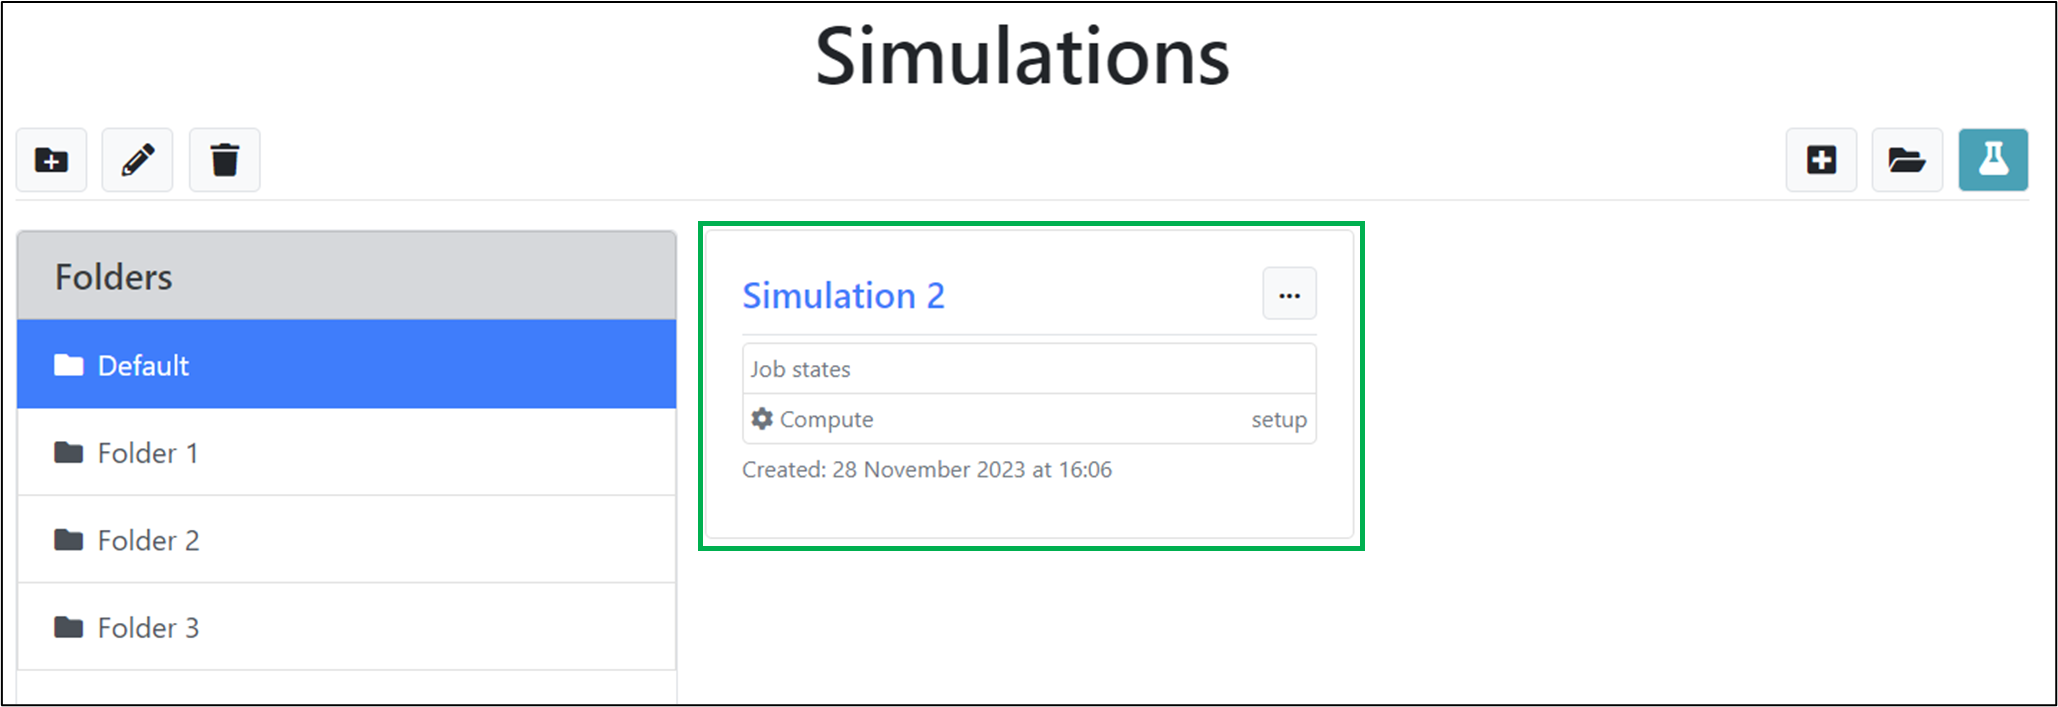
The imported simulation appears in the list of simulations of the selected folder.
Renaming a simulation
To rename an existing simulation (e.g. ‘Simulation 1’):
- Click on the dropdown button for the simulation.
- Click on the ‘Rename’ option.
 Renaming a simulation.
In the ‘Edit simulation’ window that opens:
- For the ‘Simulation name’ field, enter the new name that you would like to use for the simulation (e.g. ‘Simulation 1 new’).
- Click on the ‘Edit’ button.
 Specifying a new simulation name.
The re-named simulation will be displayed in the list of simulations for the folder as before:
 The renamed simulation displayed in the list of simulations.
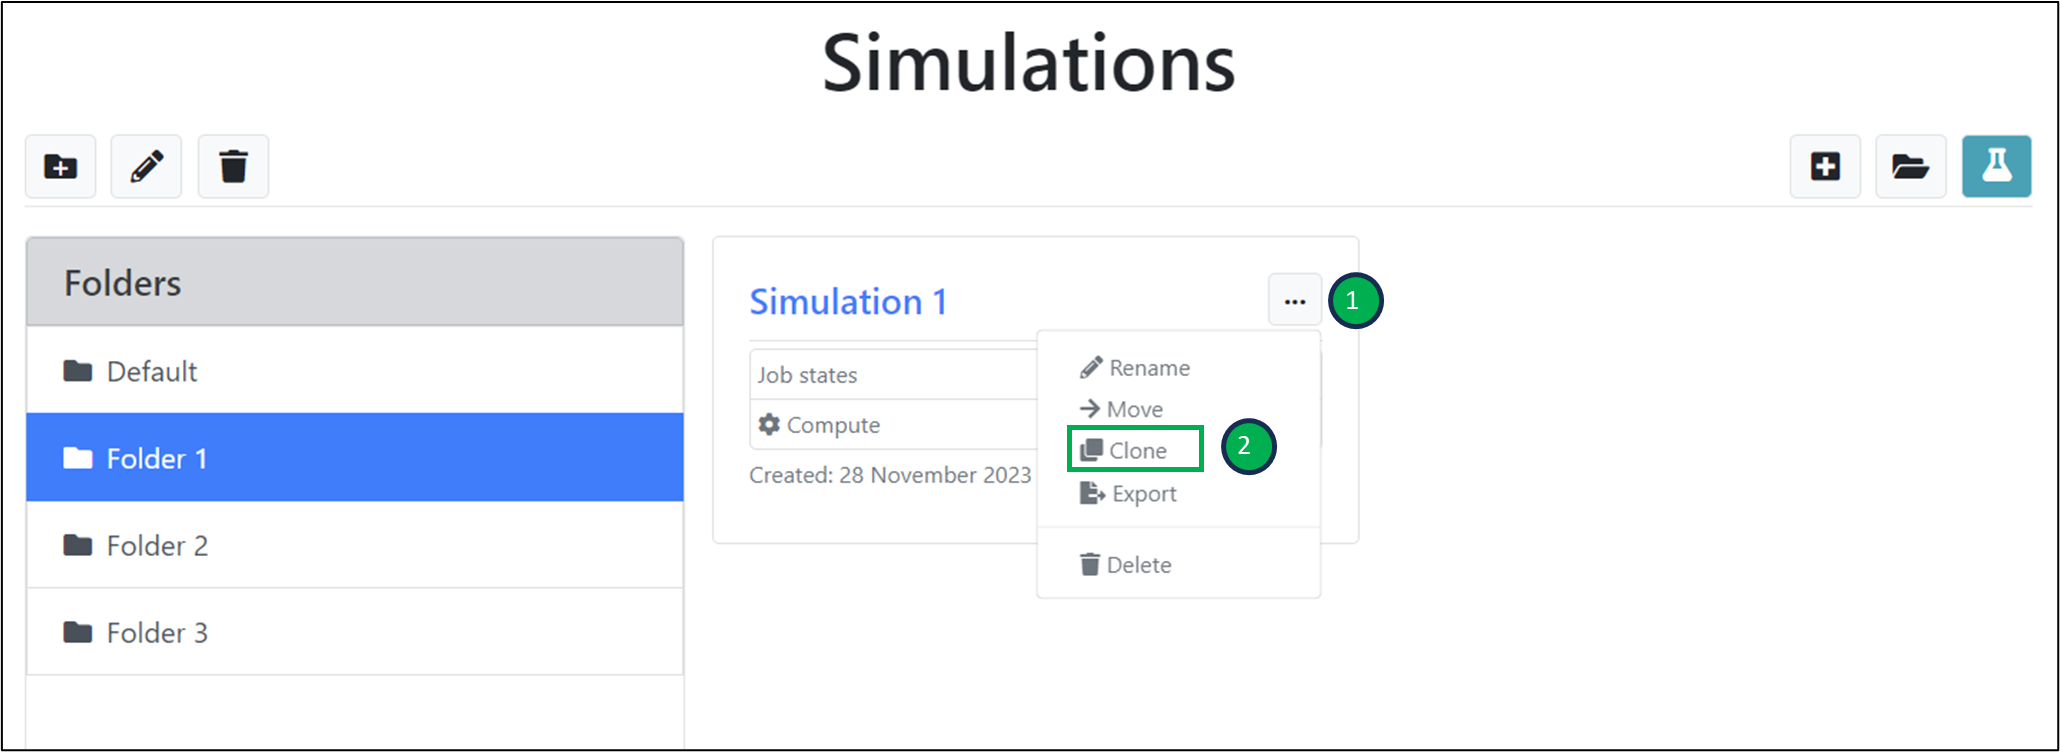
Cloning a simulation
It is often useful to use an existing simulation setup as a starting point for creating a new simulation. This can be done by cloning a simulation into a new one. To clone an existing simulation (e.g. ‘Simulation 1’):
- Click on the dropdown button for the simulation.
- Click on the ‘Clone’ option.
 Cloning an existing simulation.
In the ‘Clone simulation’ window that opens:
- For the ‘Simulation name’ field, enter the new name that you would like to use for the cloned simulation (e.g. ‘Simulation 1_copy).
- Click on the ‘Clone’ button.
 Specifying a name for the cloned simulation.
The cloned simulation will be displayed in the list of simulations for the folder.
 The cloned simulation displayed in the list of simulations.
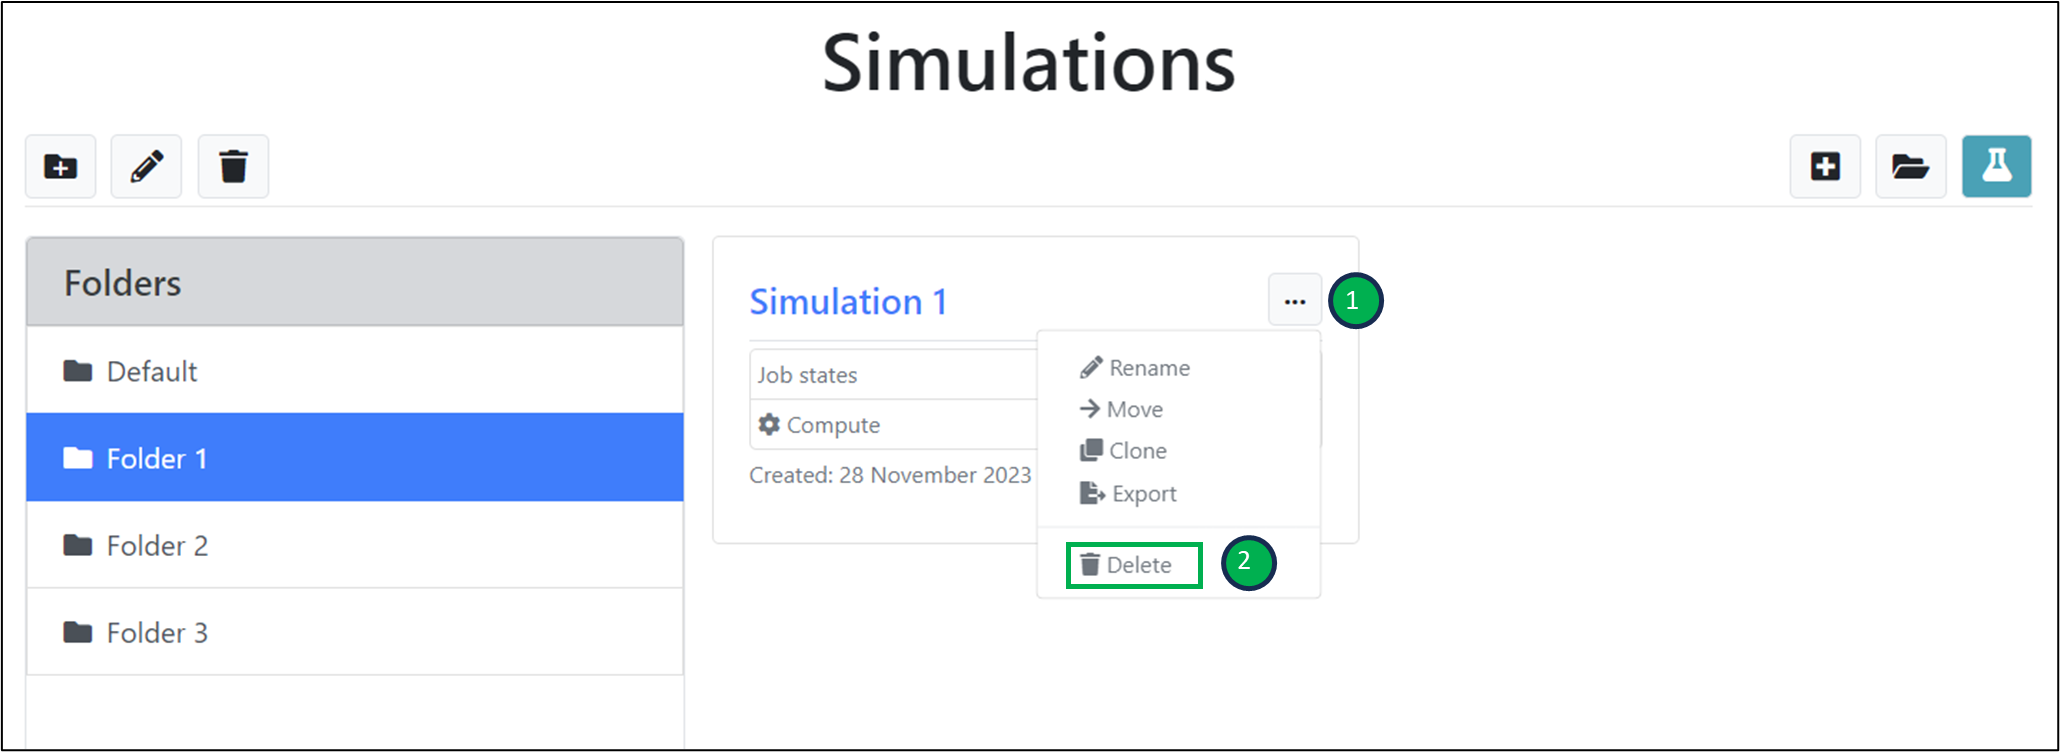
Deleting a simulation
To delete an existing simulation (e.g. ‘Simulation 1’):
- Click on the dropdown button for the simulation.
- Click on the ‘Delete’ option.
 Deleting an existing simulation.
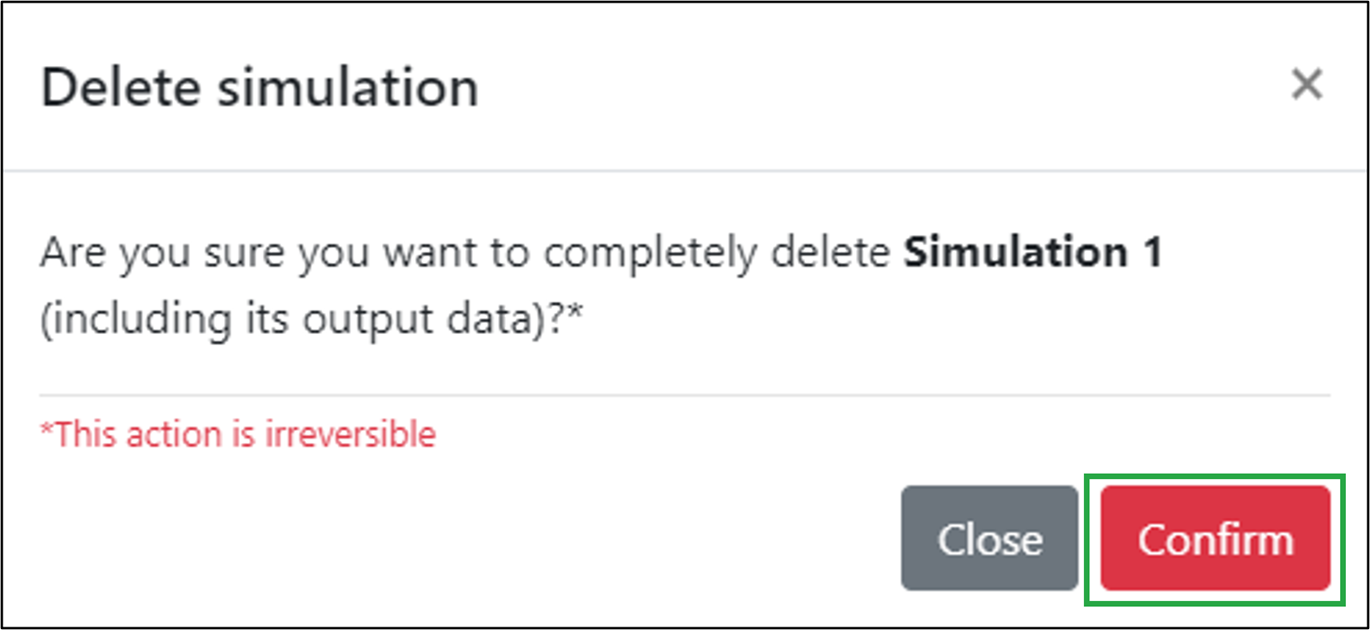
In the ‘Delete simulation data’ window which opens, click on the ‘Confirm’ button:
Confirming the deletion of simulation output data.
The deleted simulation is removed from the list of simulations for the folder:
In the ‘Delete simulation data’ window which opens, click on the ‘Confirm’ button:
 The deleted simulation is removed from the simulations list.
We’d be happy to help. Get in touch today.
© 2026 Cambridge Advanced Simulations. All Rights Reserved. Privacy Policy. Terms of Use.
COMPANY
Corporate Name:
Cambridge Advanced Simulations S.A.
Legal Form: Single Member S.A.
REGISTRATION
GEMI No: 188724401000
Athens